 NOTA
NOTA
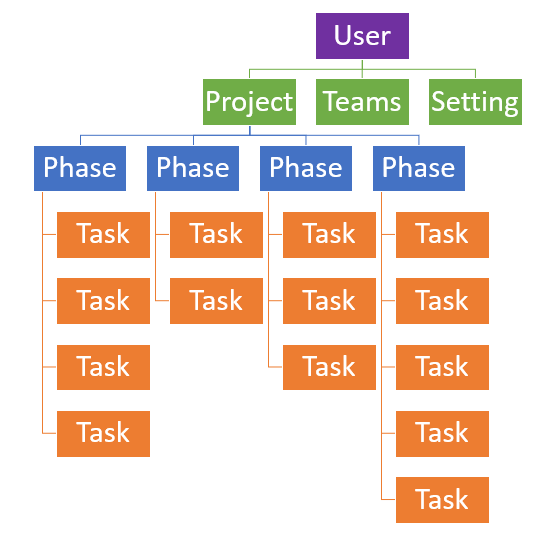
A. Summary
→ Creating a new account
→ Account Login
→ Project management
→ Phase management
→ Task management
→ Team management
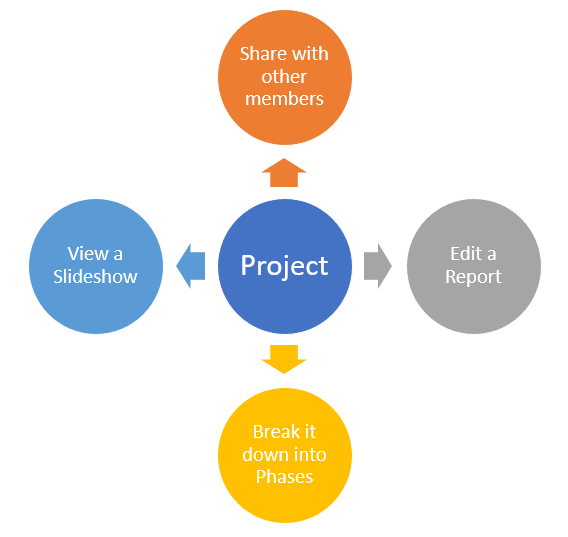
→ Sharing a project
→ Setting
→ Website and Portfolio
B. Functioning

C. User manual
1. Registration
- Click on
Sign up for free - Enter your first and last name
- Enter your email address
- Enter your password
- Click on
Save
2. Accessing Your Account
2.1 Login
- Click on
Login - Enter your email address
- Enter your password
- Click on
Login
2.2 Forgot Password
- Enter your email address
- Click on
Forgot Password?
An email containing a new password will be sent to you, and once logged in, attempt to change it.
3. Projet

3.1 Creating a New Project
- Click on
My projects - Enter the Project Title
- Enter the start and end dates
- Click on

The new project will appear in the list below.
You can use the icon ![]() to generate a project based on the selected template.
to generate a project based on the selected template.
Available templates include:
- Phone Directory
- Resume
- Portfolio website
- Showcase website
- My Day
- My Week
3.2 Modifying a Project
- Click on
My projects - Click on
 next to the project line
A window will appear to make the necessary modifications.
- To save the updated project:
- Click on
Modify
3.3 Deleting a Project
- Click on
My projects - Click on
 next to the project line
A window will appear to confirm the deletion.
- To permanently delete the project:
- Click on
Confirm
Note: Deletion can only be performed if the project contains no phases!!!
3.4 Slideshow Display
You can display project information in slideshow format.
- Click on
 next to the project line
3.5 Editing a Report
You can view a report containing all project information.
- Click on
 next to the project line
You can print this report either on paper or export it to a PDF file.
4. Phase
4.1 Creating a New Phase
- Click on
My projects - Click on the project title to divide into phases
- Go to the New Phase section on the same page
- Enter the phase title
- Enter the phase order
- Click on

The new phase will appear in the list below.
4.2 Modifying a Phase
- Click on
 next to the target phase line
A window will appear to make the necessary modifications.
- To save the updated phase:
- Click on
Modify
4.3 Deleting a Phase
- Click on
 next to the target phase line
A window will appear to confirm the deletion.
- To permanently delete the phase:
- Click on
Confirm
Note: Deletion can only be performed if the phase contains no tasks!!!
4.4 Slideshow Display
You can display phase information in slideshow format.
- Click on
 next to the target phase line
5. Task (Note)
5.1 Creating a Task
- Click on
My projects - Click on the project title
- Click on the phase title to divide into tasks
A new page will appear, containing the project title and phase title, along with the number of tasks in the chosen phase.
- Click on + in the
New Task area - A form will allow you to enter information for the new task:
- Task Title
- Task Content
- Assignee of the task
- Task priority
- Link to the resource (document, video, or image) associated with the task
- Click on
Add to save the new task
5.2 Task Content and Status
To format task content:
- To bold and underline text, use the dollar sign $ before the text
- To create lists, use an asterisk * before each list item
- To display a paragraph as a block with a gray background, place the Character µ at the beginning
A task goes through three states:
- On hold
- In progress
- Closed
Each state has a color that can be changed in the settings.
5.3 Editing a Task
At the bottom of each task, there are action icons that you can use:
 To edit task data
 To change the task status
 To access the resource attached to the task
 To delete the task
5.4 Displaying Tasks of a Project
- Click on
My projects - Click on the project title
- Click on the phase title
A new page will appear, containing the project title, phase title, and the number of tasks in the chosen phase.
All tasks are displayed in a mosaic format.
5.5 Displaying Tasks of Another User's Project
- Click on
Organization - Click on
Collaboration Tasks
A user can assign a task, in the context of a collaborative project, to another user, provided that user is a member of one of their teams.
In this case, the receiving user can only change the task status.
The project owner receives a notification
![]() once the task is closed.
once the task is closed.
6. Teams
6.1 Creating a New Team
- Click on
My teams - Enter the name of the new team
- Click on

The new team will appear in the list below.
6.2 Modifying a Team
- Click on
 next to the target team line
 - Modify the team name
- Click on
Modify to save
6.3 Deleting a Team
- Click on
 next to the target team line
A window will appear to confirm the deletion.
- To permanently delete the team:
- Click on
Confirm
Note: Deletion can only be performed if the team contains no members!!!
6.4 Adding a Member to a Team
- Click on the name of the target team
- Enter the member's email address and press enter
- If the member exists, their information will appear
- Click on
Attach
6.5 Detaching a Member from a Team
- Click on
Detach next to the member's line
7. Project Sharing
7.1 Project Level Sharing
- Click on
My projects - Click on
 next to the target project line
 - Click on Share: Yes
- Click on
Modify to save
7.2 Team Level Sharing
- Create a team named Partage-ProjectID
- Example: if the project ID is 1245, name the team Partage-1245
- Attach the users involved in this sharing to the created team above
7.3 Communication of Shared Project
- Send the link https://nota-en.com/diapoprojet/ProjectID to the recipients
- Example: https://nota-en.com/diapoprojet/1245
- Or create a task that contains the above link as a resource and assign it to the recipients
7.4 Disabling Sharing
- To completely disable sharing, switch the project's share field to No
- To deny access to a specific user, detach them from the team
7.5 Automatic Sharing
To facilitate project sharing:
- Click on
 next to the target project line
 - The sharing team will be automatically created
- Then attach the beneficiaries of this sharing to the team
8. Settings
Through the
- Modify the colors of:
- Task Titles
- Title background
- Background of task content (On hold, In progress, Closed)
- Add a background to your slideshows, CVs, and reports
- Choose a layout for your reports
- Change your password
- Change your profile picture
- Change your subscription type
- Choose the website banners
D. Generation of Website and Portfolio
1. Automatic Generation of the Website
Utilize the icon ![]() to generate a project according to the chosen template
to generate a project according to the chosen template
Available templates:
- Portfolio Website
- Showcase Website
Once a template is chosen, click on ![]() to save your website,
then the phases (sections) of the project will be created automatically and an icon
to save your website,
then the phases (sections) of the project will be created automatically and an icon ![]() will be added to visualize your website.
will be added to visualize your website.
You can add a phase (section) according to your needs. The phases will be displayed as a menu on the new website.
The tasks within a phase will be the blocks of your website.
2. Structure of the Website
- The first phase:
- It contains the name of the banner to add to the website.
-
There are 40 banners [image-1.jpg - image-40.jpg], which you can view through the
Setting menu. - A background color [red - green - yellow - blue - pink - orange - gray - black]
- The vertical bar [Alt Gr + key 6] is mandatory to separate two parameters
-
Example:
image1.jpg | red-right
- The second phase:
- It contains "Profile Photo" | "Name" | "Color-Name" | "Short Message" | "Color-Message" | "Color-Titles" | "Menu-Type"
- Text colors [red - green - yellow - blue - pink - orange - gray - black]
- Menu type: [type-simple-blue; type-simple-red; type-simple-green; type-simple-yellow]
- Click on Menu Type and choose the "Navigation Menu" section to see other menu formats
-
Example:
25.jpg | EL JAHED Khalid | white | Short Message... | yellow | red | type-simple-red
- The other phases represent the menu of the website and their tasks are content-related.
3. Sections of the Website
Which blocks will be used in the new website?
- A Task with Content will display as a title and a paragraph below.
-
A Task with Content and a Resource Link will display in two equal columns:
- The left column will contain the title and paragraphs
- The right column will contain the resource (an image or video)
-
If you do not want to display the title of the task, it must only contain (4 points)
....
-
A Large Title + Explanatory Text: the title of the task must be
bigtitle -
A Table: the title of the task must be
table and the table elements must be displayed in the Text area in CSV format (semicolon separates table elements) -
Displaying Text in Columns: the title of the task must be
columns and each column must be separated from the next column by==== (4 equals signs) -
FAQs (Question / Answer): the title of the task must be
accordion , each question must be preceded byQ: and each answer byR: . Each line of the answer, even if empty, must be preceded byR: . Each Question/Answer pair must be separated from the next pair by==== (4 equals signs) -
A Progress Bar: the title of the task must be
progression
Each bar must be entered as follows: a caption;numeric value [0-100];a color
Colors [black - gray - red - green - blue - pink - orange]
To style your website or portfolio:
-
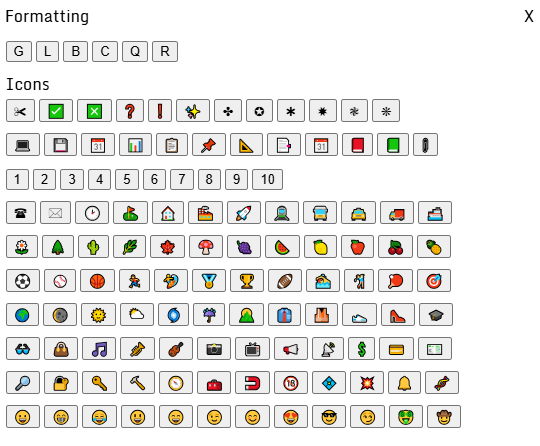
You can use icons available in nota:
-
At the task title level, enter only the icon code.
Example: 8542;Task Title - At the content level, insert the icon from the table below.

-
At the task title level, enter only the icon code.
-
Add existing images from other platforms:
https://icons8.com
https://unsplash.com
Just add the link to the image you want to insert.
The website powered by Nota will have the URL https://nota-en.com/site/number
You can purchase a domain name and link it to your website, for this contact the Nota administrator at the following addresses:
- eljahed@ejksoft.com
- nota-fr@ejksoft.com
Example of Portfolio Site: View ...